Do you want your WordPress posts and pages to display the date they were last updated?
Showing when your content was last updated can build trust with readers and help you climb the search engine rankings.
Not only does Google prioritize recently updated webpages, but your website visitors also want to know that they’re reading information that is up-to-date.
In this tutorial, I’ll show you how to display and change the last modified date of your posts in WordPress. I’ll cover multiple options for how to display your date, as well as several methods.
Why You Should Display Last Updated Date on WordPress Posts
As part of the content team at OptinMonster, I’ve been paying close attention to the importance of regularly updating posts and displaying the “last updated” date.
In fact, we just launched a new website, and we changed the date display from looking like this:


To looking like this:


As you can see, we’ve always displayed a published date on our blog posts. Now, we’ve shifted the language to “last updated” to demonstrate that we are regularly monitoring our content and keeping it up-to-date.
Displaying the last updated date on your WordPress posts is an important factor in enhancing your website’s credibility, SEO performance, and user engagement. Here’s why it’s so important:
SEO Benefits
Up-to-date content is absolutely vital to your SEO efforts. Here are some of the SEO benefits of showing a last updated date on all your posts.
- A displayed recent date signals to search engines that your content is current, positively impacting search rankings.
- Fresh content is more likely to be indexed and ranked higher by Google.
- Regular updates increase the chances of your content being discovered by users.
User Trust
When it comes to winning over readers, a recent last updated date accomplishes the following:
- Builds credibility by showing visitors that you’re staying on top of updating your content.
- Reassures users that they are getting the latest and most accurate information.
- Encourages visitors to stay longer on your site, instead of leaving when they see the content is undated or out-of-date.
Content Relevance
Regular updates to your WordPress posts help you:
- Keep your content up-to-date with changing trends, statistics, and best practices.
- Maintain your authority in your niche by providing accurate, relevant information.
- Increase the likelihood of users returning to your site and recommending it to others.
Reduced Bounce Rates
A high bounce rate is the enemy of any content marketer, and displaying a recent update date at the top of your posts can help improve your bounce rate. Here’s why:
- Visitors are less likely to leave quickly if they see a recent update date.
- When you show that you’re regularly updating your posts, it encourages users to explore more of your content, improving engagement metrics.
- When users spend more time on your site, it sends positive signals to search engines about your site’s value and relevance.
Difference Between Published & Last Updated Dates in WordPress
Before I dive into my tutorials, let’s be clear on the difference between the published date and last updated date in WordPress.
The published date refers to the original date when the post or page was first made live and available to the public. This is the date when the content was initially created and shared with your audience. On the other hand, the last updated date reflects the most recent time that you changed and saved that post or page.
WordPress automatically tracks the published date and last updated date in the metadata for your posts and pages.
How to Change the Publish Date on WordPress Posts
With all of the potential benefits I listed above, it’s important to change the date on your WordPress posts each time you make a significant update or change.
First, let’s say you’re not interested in changing your settings or adding any coding or plugins. You just want your published date on your posts to reflect your most recent update. I’ll show you how to accomplish that in both Gutenberg and Classic editors.
Important note: Changing the published date on a post will also change the post’s placement in your blog feed. For instance, if you update a 3-year-old post to today’s date, it’ll display at the top of your feed as your most recent post.
How to Change Post Date in WordPress Block Editor (Gutenberg)
Whether you’re using Gutenberg or the Classic editor, you can change your post date in just a few clicks.
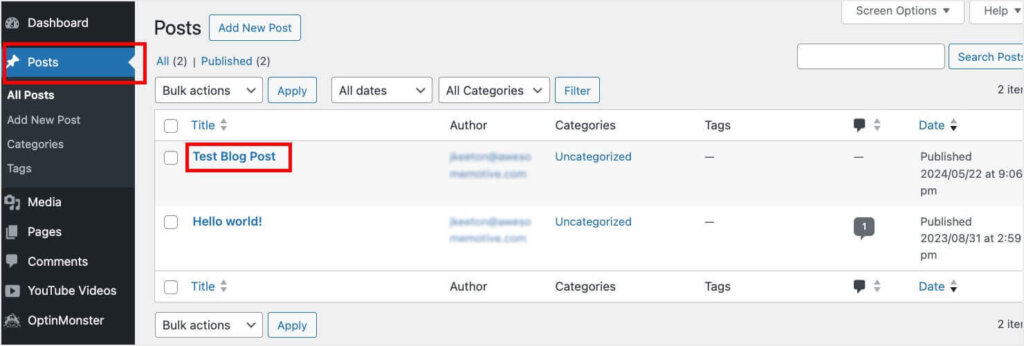
1. Open your WordPress dashboard and select Posts in the left navigation panel. Then, click on the blog post that you want to update.

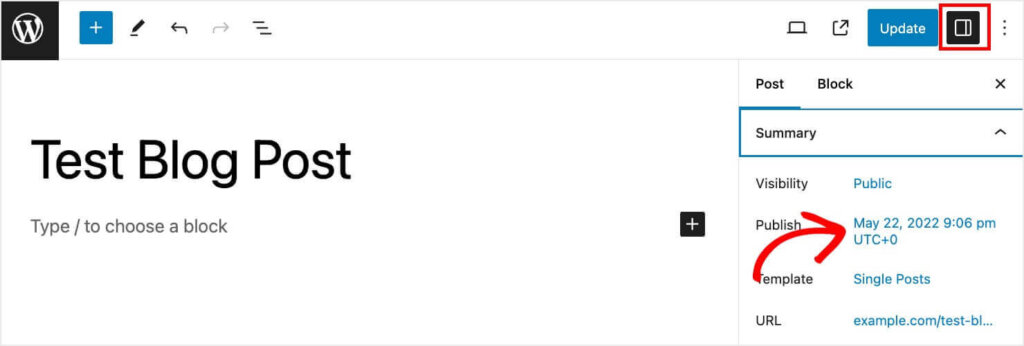
2. Once you’ve made the changes to your post, you can change the date. You should see a settings panel on the right side of the screen. If you don’t, click on the dark gray button at the upper right, directly next to the blue Update button. Make sure that the Post tab is selected, and click on the date listed under Summary.

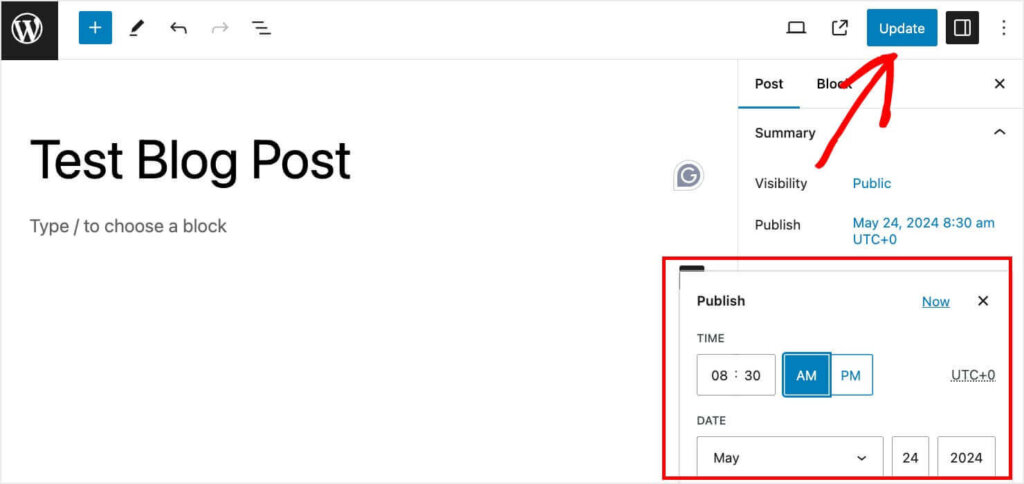
3. You’ll see a small popup window that lets you choose a new Publish date and time. Once you’ve set the new date and time, click the Update button. Clicking update will push all of the changes you’ve made live, including the new date. This change will affect the timestamp metadata of the post, which is crucial for SEO as it updates the snippet seen in Google search results.

How to Change Post Date in WordPress Classic Editor
If you’re still using the Classic editor, the process is still nearly identical:
- In the WordPress dashboard, select Posts in the left navigation menu and choose the post you want to update.
- Update your post content with new, relevant information.
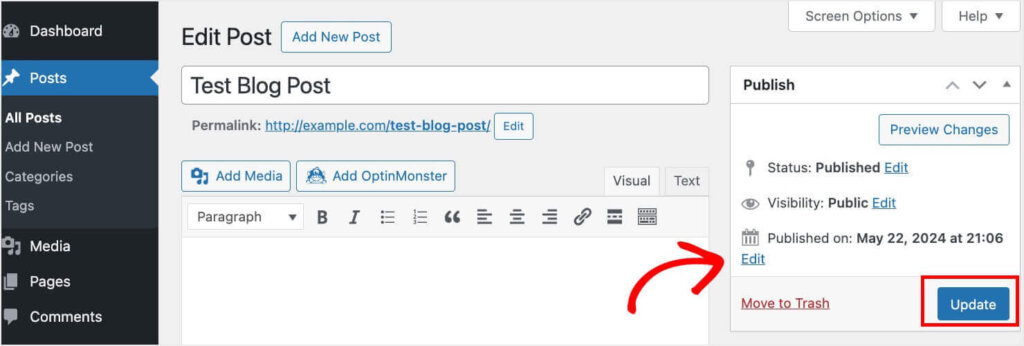
- In the panel on the right, you’ll see a Publish section. Click the Edit button beside or underneath the date.
- Change the date and time, and click the blue Update button.

How to Display Date as “Last Updated on” Instead of “Published on”
By default, many WordPress themes will display a standalone date or introduce the date with “Published on.” If you regularly update your posts and change the publish date, readers will see that your content is recent.
However, the phrase “Last Updated” indicates to readers that you’re monitoring and regularly updating your content. Let’s go over a couple of ways to change how your website displays your date.
Method 1: Use Your WordPress Theme’s Appearance Settings to Display Last Updated Date
Your WordPress theme may let you change how your published date is displayed. Not all of them offer a “Last Updated on” option, and the exact steps will vary for the themes that do. But here are some general steps to find this setting for your WordPress theme:
- Click Appearance in the left navigation menu in your WordPress Dashboard
- Click Customize.
- Look for theme settings related to post settings or date display.
- Change the settings to display “Last Updated On.”
- Save and publish the changes.
Method 2: Create a Site-Specific Plugin to Display “Last Updated on” instead of “Published on”
If your theme does not provide built-in options to display the “Last Updated On” date, you can create a site-specific plugin. Creating a site-specific plugin lets you add custom functionality to your WordPress site without modifying your theme files. This method ensures your custom code remains intact even if you change or update your theme. Here’s how to create a site-specific plugin to display the “Last Updated On” date instead of the “Published On” date.
If you already know how to create a site-specific plugin, here’s the PHP code you need to add:
function wpb_last_updated_date( $content ) {
$u_time = get_the_time('U');
$u_modified_time = get_the_modified_time('U');
if ($u_modified_time >= $u_time + 86400) {
$updated_date = get_the_modified_time('F jS, Y');
$updated_time = get_the_modified_time('h:i a');
$custom_content .= '<p class="last-updated">Last updated on '. $updated_date . ' at '. $updated_time .'</p>';
}

    $custom_content .= $content;
    return $custom_content;
}
add_filter( 'the_content', 'wpb_last_updated_date' );
If you’re not sure how to use a site-specific plugin, follow this great step-by-step guide. I promise it’s easier than it sounds!
Method 3: Show Last Updated Date With WP Last Modified Info Plugin
You can also use a premade plugin to show the last modified date. I recommend WP Last Modified Info, which is free to use and highly rated.
Here’s how to set it up.
Step 1: Install and Activate the Plugin
WP Last Modified Info is available from the WordPress plugin repository. Go to Plugins » Add New.


Search for WP Last Modified Info and click on Install Now.
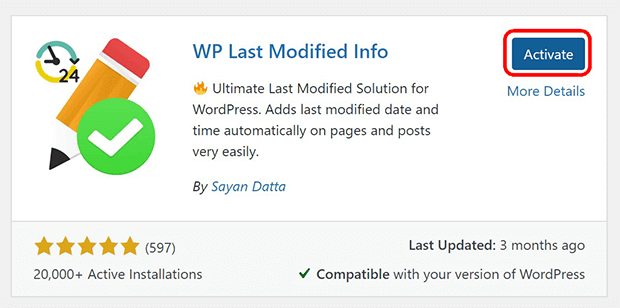
The button will change to say Activate after installation. Click on Activate.

Step 2: Configure the Last Modified Date
WP Last Modified Info will live under Settings in your left navigation panel. From the WordPress dashboard, go to Settings » WP Last Modified Info.
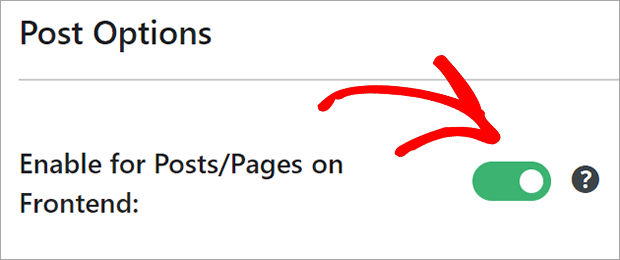
Toggle the Enable for Posts/Pages on Frontend switch to start displaying the last modified date.

Customize the display settings as you wish.
- Display Method: You can place the last modified date before or after the content, replace the published date, or insert manually with a shortcode
- Date Format: You can choose traditional (shows the date) or human readable (shows how long ago)
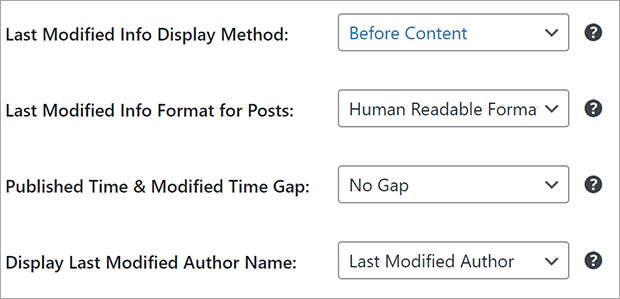

Depending on whether you choose the traditional or human readable format, different settings will appear for you to configure.
You’ll also want to customize the HTML template accordingly. This will help make sure that the text makes sense.


For example, the HTML template for traditional format might look something like:
<p class="post-modified-info">Last Updated <strong>on</strong> %post_modified% by <a href="%author_url%" target="_blank" class="last-modified-author">%author_name%</a></p>
On the other hand, the HTML template for human readable format could look like this:
<p class="post-modified-info">Last updated %post_modified% <strong>ago</strong> by <a href="%author_url%" target="_blank" class="last-modified-author">%author_name%</a></p>
Make sure to click Save Settings when you’re done.
Now you will see the last modified date on all of your posts!
How to Display Both the Original Published Date & the Last Updated Date
So far, I’ve shown you how to change the date on your WordPress posts and how to make that date say “Last Updated on.” However, you may want to display both the date your post was originally published and the date of its most recent update. Doing so has several benefits:
- Demonstrates topical authority: Let’s say your blog post shows that you originally published it 5 years ago and that your most recent update what 3 months ago. By displaying this info, you show that your site has a long history of researching and writing about the post topic.
- Shows commitment to accurate content: Similarly, this tactic also signals to readers that you’re commited to keep all information on your site up-to-date, even if it was originally published years ago.
- Provides transparency: Displaying both dates is the most transparent way to show the history of your content.
Next, I’ll share multiple methods for displaying both the “Originally Published on” and “Last Updated on” dates on your WordPress posts.
Method 1: Use Your WordPress Theme’s Appearance Settings to Display Both Dates
Once again, you should first check your Appearance settings for your WordPress theme to see if your theme already offers this customization.
- Navigate to Appearance > Customize: From your WordPress dashboard, go to Appearance and click on Customize.
- Look for options to display Both dates: Search for settings related to post meta information. These settings are often found under sections like “Layout,” “Blog,” “Single Post,” or similar categories depending on your theme.
- Adjust settings: If your theme supports displaying both the original published date and the last updated date, you will find options to enable these settings. Select the appropriate options to display both dates.
- Save your changes: Once you have made the changes, click the Save & Publish button to apply the settings.
Method 2: Create a Site-Specific Plugin to Display Both “Last Updated On” & “Originally Published On”
I explained earlier how a site-specific plugin lets you change how your published date will display, and your settings will remain stable even if you update or change your theme. Use the following code to display both the “Originally Published on” date and the “Last Updated on” date on your WordPress posts:
function show_published_and_modified_dates($content) {
 $published_date = get_the_date('F j, Y');
 $modified_date = get_the_modified_date('F j, Y');
 $content .= '<p class="published-date">Originally published on ' . $published_date . '</p>';
 if ($published_date !== $modified_date) {
 $content .= '<p class="modified-date">Last updated on ' . $modified_date . '</p>';
 }
 return $content;
}
add_filter('the_content', 'show_published_and_modified_dates');
Once again, if you need detailed instructions on creating a site-specific plugin, check out this guide from WPBeginner.
Method 3: Use WP Last Modified Info Plugin to Show Both “Last Updated On” & “Originally Published On” Dates
Last, I’ll show you how to use the WP Last Modified Info plugin to display both of these dates on your WordPress posts.
- Install and Activate the Plugin: Follow the same instructions I shared in the previous section on using this plugin.
- Configure the Plugin Settings:
- Go to Plugin Settings:
- Navigate to Settings > WP Last Modified Info from the WordPress dashboard.
- Enable Display Options:
- In the settings page, you will find several tabs. Ensure you are on the Posts tab.
- Toggle the “Enable for Posts/Pages on Frontend” switch to activate the display for posts and pages.
- Customize the Display Method: Go through the page and select how and where you want your dates displayed.
- Go to Plugin Settings:
- Configure the HTML Template: In the “HTML Template” section, you can customize how the dates are displayed. Use the following template to show both dates. %post_published% will be replaced with the original published date. %post_modified% will be replaced with the last modified date.
<p class="post-modified-info">
    Originally published on %post_published% | Last updated on %post_modified%
</p>
After configuring the settings and customizing the HTML template, scroll down and click the Save Changes button to apply your settings.
BONUS: How to Control the Last Modified Date With AIOSEO
If you use any of the methods outlined above, your posts will automatically show the last modified date.
But sometimes you may not want to show every single update, such as small proofreading corrections. Or perhaps you add a new category to your site and need to recategorize older posts. You wouldn’t necessarily need to show that all of those posts were “updated” just because the category changed.
Fortunately, it’s also easy to “freeze” the last modified date when making small updates or minor tweaks.
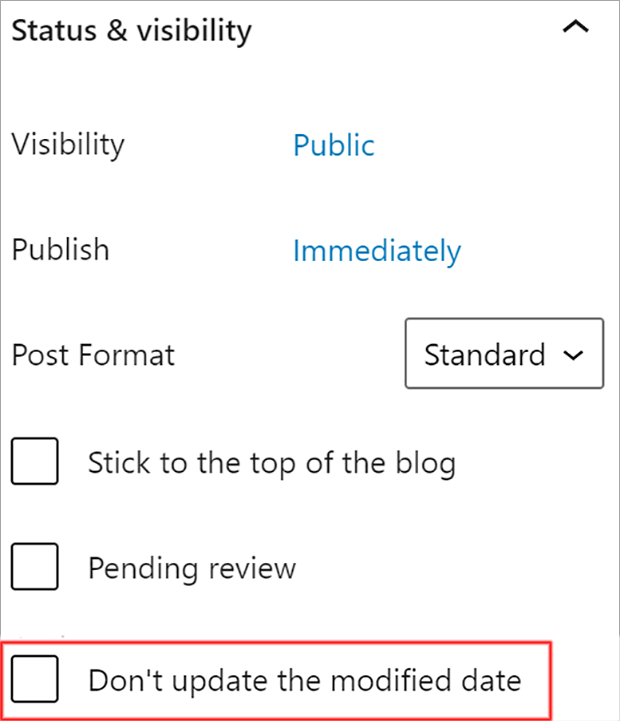
When you use the best SEO plugin AIOSEO to manage your site’s search rankings, you get an added bonus! You can easily keep the post modified date the same.

Read our full AIOSEO review and learn how to get started optimizing your content for search.
FAQs
What does “last updated” mean on a website?
“Last updated” on a website refers to the most recent date and time when the content of a webpage was significantly altered or corrected. This timestamp indicates to users and search engines that the content is being maintained and reflects the latest information, enhancing the site’s credibility and SEO value.
How can I tell when a website was last updated?
To find out when a website was last updated, you can often look for a “last updated” date usually displayed near the top or bottom of the content. If it’s not visible, the page’s HTML source code might contain a timestamp in the metadata under “last-modified” which browsers can interpret. This date provides insights into the recency of the content’s relevance and accuracy.
How can I see an older version of a webpage, from before that page was last updated?
To view an older version of a webpage, you can use services like the Internet Archive’s Wayback Machine. This service archives copies of webpages over time, allowing you to access previous versions of a site by entering its URL and selecting a date. It’s a useful tool for comparing historical webpage versions or retrieving information that has since been updated or removed.
Is there a way to automate the display of the last updated date on WordPress?
Yes, you can automate the display of the last updated date on your WordPress site by using plugins like WP Last Modified Info. This plugin can automatically append the last updated date to your posts and pages, ensuring that readers always see the most recent update timestamp. It allows customization on how and where the date appears, such as before the content or within the post metadata.
Where should I display the last updated date on my WordPress posts?
For the best user experience, your last updated date should be quickly visible to website visitors. Ideally, the updated date should be displayed in the header of the post, close to the title or the publication date. This placement immediately reassures readers that the content they’re about to read is current.
Should You Put Last Updated Dates on Blog Posts?
Yes, you should always show your last updated dates on your blog posts, and you should regularly update your posts’ content. With this article, you now know several different ways you can accomplish this goal, depending on how you want your date displayed.
Regular content updates are vital for your site’s SEO. Want to learn more tips for improving you search engine rankings? Here are a few resources:
Once you’ve nailed your SEO efforts, you need to convert those organic visitors into subscribers and customers.
That’s where OptinMonster comes in! OptinMonster is the #1 lead-generation software available. You can use our popups, floating bars, and other onsite campaigns to show the right messages to the right visitors at just the right time. Then, you can get more email subscribers, promote your best content, and drive more sales.
Disclosure: Our content is reader-supported. This means if you click on some of our links, then we may earn a commission. We only recommend products that we believe will add value to our readers.


